magus-tutorial
Here are my steps for building and installing firmware for the Rebel Technology Magus from scratch on a Windows 10 machine. Some of these steps may also work for other “OWL” (Open Hardware Laboratory) devices.
If you don’t want to build a firmware, you just want to install one, you can download an official firmware from Github and then skip to step 6.
If you are planning to change the firmware code before building it, you may want to run the OPTIONAL, SCARY STEPS at the bottom of this guide first, for safety.
If you know what STM32CubeMX is and want to change programmer settings, run the EVEN MORE OPTIONAL, EVEN SCARIER STEPS below that.
STEPS
-
Install Ubuntu for Linux for Windows.
-
Check out https://github.com/pingdynasty/OpenWare with Ubuntu for Linux git. For these instructions you’ll need the “develop” branch, and you’ll want to “recurse submodules”. You can do all this with:
git clone --recursive -b develop git@github.com:pingdynasty/OpenWare.git-
Did it say something about “permission denied (publickey)”? Unfortunately, because we’re using submodules, you’ll need to have a GitHub account and you’ll need to set up “ssh keys”. You can sign up for GitHub here, and you can find the instructions for setting up an ssh key here. (Note because we’re using Ubuntu for Windows, you’ll want to follow the Linux instructions, but when they tell you to use xclip, don’t do that– instead, run
clip.exe < ~/.ssh/id_rsa.pub.) -
Below I’ll call the directory you checked OpenWare out to
$OPENWARE_DIR. You can save that to a shell variable bycding into the checkout directory and runningexport OPENWARE_DIR=`pwd`.
-
-
In Ubuntu for Windows, install gcc for 32-bit embedded ARM (with
sudo apt install gcc-arm-none-eabi) -
I DID THESE STEPS, BUT YOU PROBABLY SHOULDN’T:
-
I edited checkout directory
common.mkand replaced the GIT_REVISION line with:GIT_REVISION = $(shell hg log --template='{bookmarks} {gitnode|short}' -r .) $(CONFIG)This step is a byproduct of something special and weird about my computer (I use Mercurial rather than Git).
-
If you’re going to do the OPTIONAL, SCARY STEPS this point is when you should do them.
-
-
Run
make magus TOOLROOT=in checkout directory. -
Check out https://github.com/pingdynasty/FirmwareSender with git:
git clone https://github.com/pingdynasty/FirmwareSender.git- Below I’ll call the directory you checked this out to
$SENDER_DIR. You can save that to a shell variable bycding into the checkout directory and runningexport SENDER_DIR=`pwd`.
- Below I’ll call the directory you checked this out to
-
Open the Visual Studio solution in
$SENDER_DIR/Builds/VisualStudio2015, click the menu at the top that says “Debug” and switch to “Release”, select “Build Solution” in the Build menu. -
Run:
$SENDER_DIR/Builds/VisualStudio2015/Win32/Release/ConsoleApp/FirmwareSender.exe -in `wslpath -m $OPENWARE_DIR/Magus/Build/Magus.bin` -save `wslpath -m $OPENWARE_DIR/Magus/Build`/Magus.bin.syxThis creates a file Magus.bin.syx.
-
Go to the Firmware uploader web page and follow the instructions there, feeding it the Magus.bin.syx file.
OPTIONAL, SCARY STEPS
INSTALLING THE SAFETY BOOTLOADER
On some OWL family devices, there is a button you can hold down to kick the device into bootloader mode. The Magus doesn’t have a button like this. The only way to boot the Magus into bootloader is to send it the “reboot into bootloader” MIDI message. This means if your Magus firmware has a bug that causes it to hang at launch, before it gets to the point of receiving MIDI, you cannot get into the bootloader at all and your device is now a brick.
The solution to this is to install the newer, “safe” bootloader. This uses something called a “watchdog” which means if the Magus firmware ever hangs for a sufficiently long period of time, it will automatically fall into the bootloader.
However there are two problems with the safety bootloader:
- It is hard to install, and
- Once you install it, you must ONLY install firmwares that are compiled for use with the safety bootloader. You can’t use official firmware anymore. You can only use firmware you compiled yourself.
As long as you use only officially released firmwares, you do not need the safety bootloader, because these have been tested. But if you are going to be modifying the firmware code, probably you should switch to the safety bootloader and compile your firmwares with watchdog support. Here’s how.
(Aside: Do you know how to solder? If so, you might want to instead follow these instructions by antisvin. The antisvn approach here is better because it means you can just plug in the programmer without having to take the Magus apart.)
-
Run steps 1-4 of the main tutorial
-
You need to buy an ST programmer. You can get this for about $30 from ST, or if you search “st programmer” on alibaba or amazon you can get a very cheap knockoff.
- By the way, once you have the ST programmer, you can just stop here. If you have a programmer you have the option of simply waiting for the Magus to crash and brick itself, and then using the ST programmer to rescue it from brick state.
-
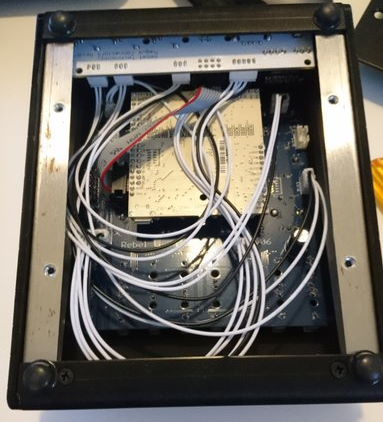
Unscrew the four screws on the underside of the device and remove the flat panel.
-
You should see a little white square board inside the unit. To get it out, you’ll have to remove the “IO board”, which is that other wide board in the way.
-
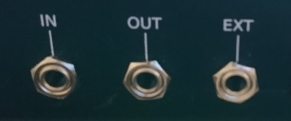
To do this, unscrew the IN, OUT and EXT plugs– yes, the actual plugs, the little hexagonal protrusions on the outside. You can do this with an 8MM ratchet.
-
Remove the IO card by pulling up.
-
-
Now you need to remove the little white board. It holds on to its sockets pretty tightly, so try gripping it at the edges and rocking it back and forth from top to bottom until it comes loose.
-
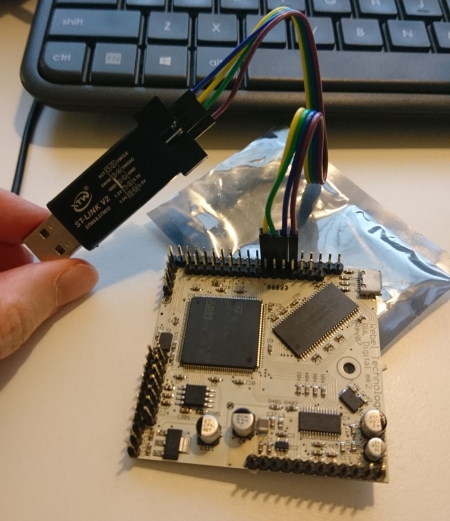
Now it’s time to connect the white board to the ST programmer. This diagram shows the names of the pins on the board (it’s not the same revision as is in the Magus, but the programmer pins don’t change). You will need to connect SWDIO, GND, SWCLK, and 3.3V. There are many pins so make absolutely sure you connected the right ones!
-
Now we have the hardware set up, let’s build some firmware.
Turn on the watchdog (“IWDG”) in the bootloader and the Magus firmware:
-
Edit
MidiBoot/Inc/hardware.h, and uncomment#define USE_IWDG -
Edit
Magus/Inc/hardware.h, and add#define USE_IWDGto the end.
-
-
Build the bootloader:
make midiboot TOOLROOT= PLATFORM=Magus -
Now that we have both the hardware and firmware, we can upload. First we need to install OpenOCD.
-
If you are on Windows, download OpenOCD for Windows.
-
This part is going to be a little irritating: OpenOCD for Windows doesn’t have an installer. To make path futzing easy, we’ll unpack OpenOCD into the OpenWare directory.
-
Uncompress the OpenOCD distro. (You’ll need 7zip, or you can do it in Ubuntu for Windows with
7z x path/to/openocd.7z.) -
Move the uncompressed OpenOCD folder to
$OPENWARE_DIR/openocd. By the time this is done, there should be a file namedopenocd/info.txt; if 7zip added an extra folder so the path looks likeopenocd/openocd-0.10.0/info.txt, move the inner folder up one and name thatopenocd. -
Run this exact line from
$OPENWARE_DIR, so the MidiBoot Makefile will know how to find OpenOCD:export OPENOCD="`pwd`/openocd/bin-x64/openocd.exe -s `wslpath -m ./openocd/scripts` -f `wslpath -m ./Hardware/openocd.cfg`"You will need to run this
exportcommand every time you open up a terminal window. If you close the window or switch to another tab, Ubuntu will forget yourexports.(Want to understand where this mystery line came from? Read this page in the openocd documentation and
wslpath --help.)
-
-
If you are trying to follow this guide from Ubuntu, you can
apt install openocdand it will just work. However if you are using Ubuntu for Windows as I suggest in this guide, then do not install the Ubuntu version of openocd; as of Oct 2020, WSL does not support it.
-
-
Now let’s test if openocd is working. Run:
(cd MidiBoot && make info)-
Did it fail with the error “Can’t find interface/stlink.cfg”? This is expected if you are running OpenOCD 10 (the Makefile currently assumes you’re running the still-in-beta OpenOCD 11). In OpenOCD 10 or earlier, the stlink configuration is installed as “stlink-v2.cfg”.
So: Edit
Hardware/openocd.cfgin $OPENWARE_DIR and change[find interface/stlink.cfg]to[find interface/stlink-v2.cfg]. Try make info again.-
Is it still not finding it? Try running this and seeing if it spits out any promising-looking filenames:
-
On Ubuntu for Windows:
find $OPENWARE_DIR/openocd | grep cfg | grep stlink | grep interface -
On “real” Ubuntu:
find /usr/share/openocd/ | grep cfg | grep stlink | grep interface
-
-
-
Did it fail with the error “LIBUSB_ERROR_NOT_SUPPORTED”? If you are on Windows, this means your knockoff programmer did not install the WinUSB drivers properly.
-
We can install them manually. Go to zadig.akeo.ie and download the Zadig tool.
At the top of the window there’s a dropdown menu. It should automatically have set itself to “STM32 STLink”. If it doesn’t say something about STLink, click the menu and try to select your STLink device.
Under that there’s a little box for the “target driver”. It probably says “WinUSB” to start off. There’s two little bitty buttons next to it with up and down arrows. Click the down arrow until the box says “libusbK”. (“WinUSB” will also probably work, but libusbK is what I used. What I’m told is libusbK works more often for unusual devices such as cheap knockoffs.)
Now click the “Install Driver” button.
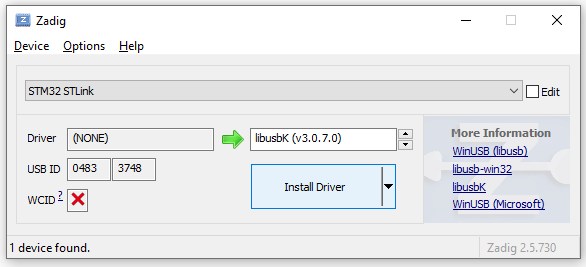
Once it says the driver is installed, close Zadig and try “make info” again.
(Want to understand this step? Read the OpenOCD Windows README.)
-
-
Did it fail with the error “open failed”, and no further information? Make sure the programmer is plugged in and the wires are firmly attached.
-
Did it print a bunch of lines labeled “Info :” and ending with “STM32F4xx - Rev: 3”? Good news! It worked.
-
-
The Magus chip is write-protected to make sure any writes are on purpose. The first step is to unlock it:
(cd MidiBoot && make unlock)- Did it fail with the error “timed out while waiting for target halted”? This happened to me, and the solution turned out to be to edit
$OPENWARE_DIR/MidiBoot/Makefileand change the two files underunlock:so that they sayhaltinstead ofreset halt.
- Did it fail with the error “timed out while waiting for target halted”? This happened to me, and the solution turned out to be to edit
-
Upload:
(cd MidiBoot && make upload) -
Re-lock the chip, to be safe from accidental writes:
(cd MidiBoot && make lock)
We’re done! You can now resume the main tutorial from step 5 after reassembling the Magus. The reassembly process does need to be done with care:
- When you fit the white board in, it is easy to seat them against the wrong pins because some pins have no corresponding ports. The way I make sure I’m aligned correctly is I look at the row in the upper right that ends with the labels “3.3V GND 5V” on the bottom board. That row of pins has exactly the same number of pins as ports, so if that row is aligned, the entire board is aligned.
- There are little wires that normally run underneath the IO board. When you fit the IO board back in, make sure you don’t crush any little wires under one of the IO board plug parts.
- When you first fit the IO board back in, the outside plugs will all be sticking out of the case at a weird angle. You will need to push it down with a sort of rocking motion and then it will click into place and the outer plugs will be straight.
Alternately, before you reassemble, since you’ve already got a programmer plugged in, you could actually use the programmer to upload Magus firmware in addition to the bootloader you already installed. Run just step 5 of the main tutorial, then:
-
Unlock the chip again:
(cd MidiBoot && make unlock)Upload the Magus firmware:
$OPENOCD -c "program Magus/Build/Magus.elf verify reset exit"And re-lock the chip:
(cd MidiBoot && make lock)(In general, after we unlock we can run any OpenOCD command we like even without using the Makefile by running
$OPENOCD -c "init" -c "YOUR_COMMAND_HERE" -c "exit". The OpenOCD commands are documented here. Antisvin also has a tutorial for how to run the debugger, if you want to alter the code and then test your changes.)
EVEN MORE OPTIONAL, EVEN SCARIER STEPS: STM32CUBE
You only need to do this step if you want to install new code packages from ST Microelectronics. It is unlikely you will want to do this.
-
Run steps 1-4 of the main tutorial
-
Download and install “64-bit java for windows”. https://www.java.com/en/download/windows-64bit.jsp
-
Reboot.
-
Sign up for an account on st.com.
-
Install STM32CubeMX. https://www.st.com/en/development-tools/stm32cubemx.html
-
Run STM32CubeMX.
-
Click to open an existing project and choose Magus/Magus.ioc or MidiBoot/MidiBoot.ioc. It will ask if you want to migrate, say yes. Click “generate”.
- You will get a warning about “HAL timebase”. You can ignore it.
-
-
STM32CubeMX has now written a bunch of files all over the project directory. Problem: Some of these are new files (which you want) and some of these overwrite existing files (which you probably do not want!–those files have been modified by Rebel Technology, and probably for a specific reason). The simplest safest thing to do here is to cd into the
Librariessubrepo and rungit reset --hard HEAD, which will restore files to their git state (note this will also erase your local changes, unless you committed to a branch before doing step 6).
You can now resume the main tutorial from step 5.
ABOUT THIS GUIDE
This guide was written by andi mcc «andi.m.mcclure@gmail.com». You may redistribute it in whole or in part however you like as long as you retain some author credit. If this is too vague, you may use the license under CC-BY. Many thanks to mars, antisvin and whitequark for help in compiling this.